Well I finally pulled out and dusted off my sewing machine. I wanted to make burp clothes as a gift and to experiment. I plan on making some for my little one. Well first, I have to say I bought my fabric, birdseye 27" wide diaper cloth white, at full price from Joanns. After paying this price and looking at gerber's birdseye diaper cloth, I learned its cost more to buy the fabric. The only way its cheaper or comparable is if you get the fabric for 50% off or you can buy it online for pretty cheap. So my first suggestion is to do some research and find your fabric for $3.00 or less a yard. You can find it for this cheap check out fabric.com. So for this project you will need:
1. Diaper clothe white fabric ( 1 yard makes 2 burp clothes)
2. 1/4 of a yard of flannel fabric (or your choice of fabric ) for the center per burp cloth. So I got 3 different colors in 1/4 yard each.
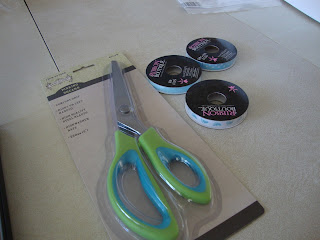
3. 1/4 " wide ribbon. I got 3 different ribbons per burp cloth
4. pinking shears
5. straight pins
6. white yarn
7. fabric pencils
The first step is to wash, dry, and Iron all your fabrics. Once you have your fabrics washed you want to cut 3 squares per burp cloth. a yard is 36" so you should get 3 12" wide burp clothes. I cut mine 12x16. Clean up edges and make sure they are the same size.
Once they are cut and even, place each one on top of the other and pin all three together.
Once you have it pinned now its time to use the sewing machine. Sew 1/4 " around the edge of all four corners of the burp cloth like so!
Now that you have your border finished, you want to make 2 seams in the middle like the diaper clothes you buy in the store. To do this, you measure the whole width of the burp cloth and divide it by 3. You want to take your ruler and mark your fabric, with your fabric pencil, on the 1/3 mark, and the 2/3 mark. Now you have 3 even sections on your fabric. Once you have them marked draw your two lines.
Once you have your lines drawn, take the fabric over to the sewing machine. You are going to sew down the center of these two lines to make seams.
Once you are finished sewing the seams, now measure the width and the length of the center of the burp cloth. Cut out a piece of the flannel fabric to fit in the middle section. Note: I cut it so that I had left 1/8 short on each side to make room for the ribbon but made sure there would be fabric under the ribbon.
Place the strip of fabric in the center.
Cut 2 strips of ribbon 16 " long , or how ever long your burp cloth is.
Pin the ribbon and the flannel to the burp cloth together.
Sew down both sides of the ribbon making sure you are sewing the flannel strip under the ribbon and securing it to the diaper cloth.
Once you have it all sewn together you need to make the edges so they do not keep unraveling every time you wash the burp clothes. There are two ways to do this. The first one is to sew along the edges of the burp cloth in a zig zag pattern. The second way, the way I chose to do it, is to take some pinking shears and cut the edges. The best way to do this is to lay the fabric down and cut along the edge as the fabric is on a surface.
That is it, you have completed your first burp cloth. I made a total of 4 and I am pretty happy with them I plan on making 20 for our baby. Ill will update you with pics when I get to them.


